Have you ever looked at your MikroTik router and wondered if it could do just a little bit more? Maybe you have a simple resume, a landing page, or a small internal tool that you want to keep online 24/7 without paying for extra hosting or web server.
With the Container package in RouterOS, your MikroTik router isn’t just a networking powerhouse—it’s actually a capable, lightweight web server. You don’t need a separate host or web server for simple sites; you just need to set it with the Nginx container on your router.
Watch the full walkthrough on the Net Admin HUB YouTube channel:
Getting Started: The Prerequisites
Before we dive into the fun stuff, we need to make sure the foundation is solid. Hosting anything publicly means security is priority number one.
- Harden Your Router: Disable any services you aren’t using (IP > Services), change your default Winbox and HTTP ports, and ensure you aren’t using the default “admin” account.
- Compatibility: Your MikroTik router needs to be on an ARM, ARM64, or x86 architecture and running RouterOS v7.5 or later.
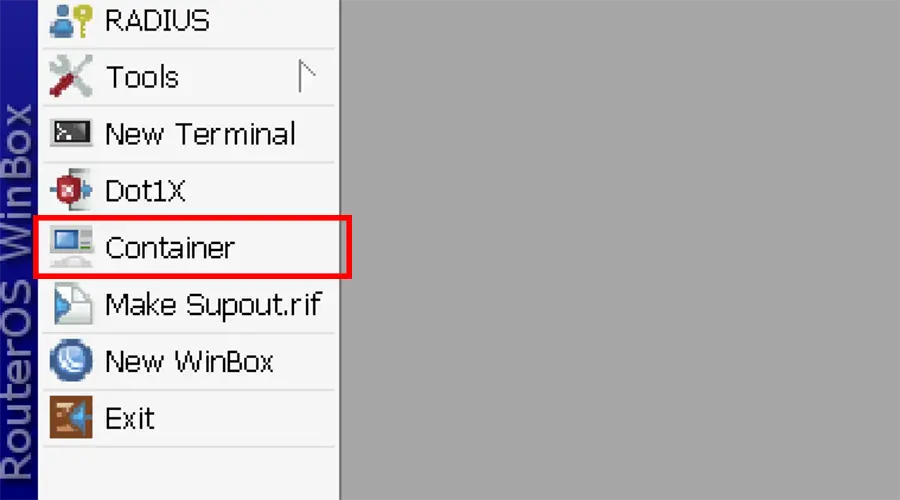
- The Package: If you don’t see the “Container” menu, you’ll need to download the “Extra Packages” bundle for your specific version/architecture from MikroTik’s website , drag & drop it to your winbox and then reboot the router.
After the reboot, should see the container menu in your winbox.
Step 1: Activating Container Capability
MikroTik has the container feature turned off when you first get it. This is because MikroTik wants to keep your router safe. If you want to use the container feature you need to do a step. You have to go to the terminal and type in a command. The command is
/system device-mode update container=yesAfter running this, you have a 5-minute window to physically press a button on your router (or power cycle it if you’re on a cloud instance like CHR) to confirm you have physical access. It’s a bit of a hurdle, but it’s a great security check.
After next boot, you can confirm Container Activation with this command
/system device-mode print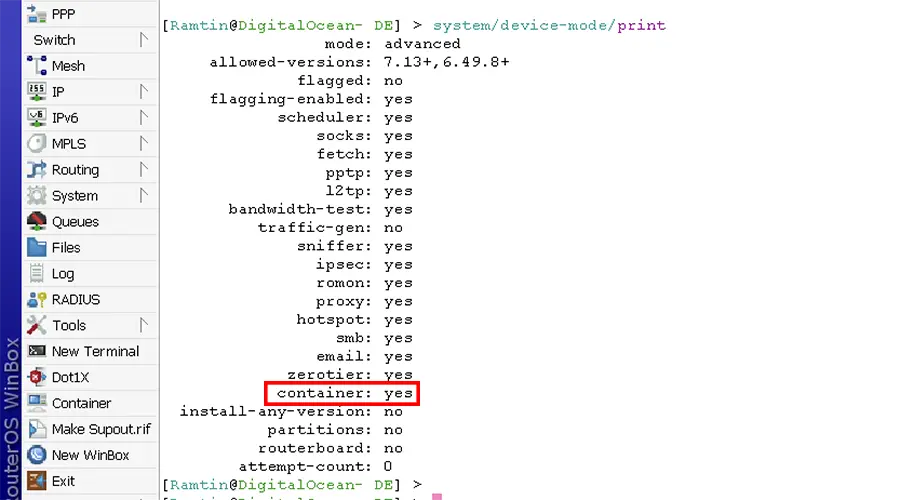
Step 2: Configuring the Network
Think of the container as a device that lives inside your router. The container needs its virtual ethernet and IP address.
Create a Bridge: To make this work you have to create a bridge. Go to the Bridge menu. Add a new bridge for example bridge-container. Then assign an IP address, like 172.17.0.1/24.
/interface/bridge/add name=docker
/ip/address/add address=172.17.0.1/24 interface=docker
Virtual Ethernet (VETH): Next you have to set up an Ethernet. Go to Interfaces, VETH and create a new interface for your MikroTik Nginx Container. Give the Nginx container an IP address like 172.17.0.2. Set the gateway to the bridge internet protocol address you just created.
/interface/veth/add name=veth1 address=172.17.0.2/24 gateway=172.17.0.1
/interface/bridge/port add bridge=docker interface=veth1
NAT Rule: Finally you need to set up a NAT rule. Go to IP > Firewall then NAT tab and create a masquerade rule, for your container network. This will allow the Nginx container to reach the internet. The MikroTik Nginx Container needs internet access.
/ip/firewall/nat/add chain=srcnat action=masquerade src-address=172.17.0.0/24Step 3: Setting Up the Container Registry
Once the networking is solid, we need to tell the MikroTik where to find the Nginx image. Think of this as setting the “source” for our software.
In WinBox, go to Container > Containeer Tab > Config. Here’s what you need to fill in:
Registry URL: Use https://registry-1.docker.io (or a local mirror if you’re in a region with restricted access, like I sometimes am).
Tmp Directory: Set this to a temporary folder (like temp) so the router has a place to unpack the image layers.
/container/config/set registry-url=https://registry-1.docker.io tmpdir=TEMPStep 4: Preparing Your Website Files (The Mounts)
MikroTik Nginx Container needs a place to look for your HTML files. Instead of keeping files “inside” the container where they are hard to edit, we use Mounts to link a folder on your MikroTik disk directly to the container.
- Create a Folder: In your files menu, create a folder named
html. - Upload Your Site: Drag and drop your
index.htmlfile into that folder. - Create the Mount: In the Mounts tab, create a new entry:
- Name:
HTML - Source:
html(the folder you just created) - Destination:
/usr/share/nginx/html(the specific path Nginx expects).
- Name:
/container/mounts/add name=HTML src=html dst=/usr/share/nginx/htmlStep 5: Creating and Running the Container
Now, we bring everything together. In the Container tab, click the plus icon to add a new one:
- Remote Image: Type
nginx. - Interface: Select the
veth1interface we set up earlier. - Mounts: Pick the
nginx-rootmount we just made. - Start on Boot: Check this so your site stays up even after a power outage.
/container/add remote-image=nginx:latest interface=veth1 hostname=nginx root-dir=nginx mounts=HTML logging=yes start-on-boot=yesClick Apply, and you’ll see the status change to “extracting.” Once it says stopped, hit Start.
Fixing file permissions
If you got “403 Forbidden” error. The fix was simpler than I thought! I just had to enter the container’s shell and give it permission to read the files. You can do this via the terminal:
container/shell 0
Then run:
chmod 755 /usr/share/nginx/html
and the site be live!
Step 6: Opening the Gates, DST-NAT and Port 80
Now that the container is running, it’s technically “live,” but only inside your router’s internal network. To let the rest of the world see your website, we need to set up Destination NAT (DST-NAT). This tells the MikroTik: “When someone knocks on my front door (WAN) looking for a website, send them straight to the Nginx container.”
The Port 80 Conflict
By default, Nginx listens on port 80 for HTTP traffic. However, there’s a small catch: your MikroTik usually uses port 80 for its own web management interface (WebFig) by default.
If you want your website to be accessible on the standard port 80, you have two choices:
- Change the MikroTik WWW port: Move the router’s management port to something else (like 8081).
- Disable the WWW service: If you only use Winbox, you can just turn off the web service entirely.
Once port 80 is “free,” we can create the NAT rule to forward traffic to the container’s IP (172.17.0.2).
So, go to IP > Firewall > NAT and create a dst-nat rule.
/ip firewall nat add chain=dstnat protocol=tcp dst-port=80 in-interface=ether1 action=dst-nat to-addresses=172.17.0.2 to-ports=80With these rules in place, anyone typing your public IP or domain into their browser will be greeted by your hosted website instead of the MikroTik login page!
Step 6: Going Public with HTTPS (The Cloudflare Trick)
Accessing your site via a raw IP address isn’t very professional. To make this “production-ready,” I used my domain on Cloudflare.
The Magic Part: Enable the Cloudflare Proxy (the orange cloud). This gives you instant HTTPS and hides your router’s IP address from the world. No need to mess with SSL certificates on the router—Cloudflare handles the encryption for us.
DNS: Point an “A” record to your MikroTik’s public IP.

Quick Setup Summary
| Component | Setting / Value |
| OS Version | RouterOS v7.5+ |
| Registry URL | https://registry-1.docker.io |
| Container IP | 172.17.0.2 |
| Mount Destination | /usr/share/nginx/html |
| HTTPS Solution | Cloudflare Proxy (Free) |
Final Thoughts
It’s intresting that we can now host a fully functional, secured website on a device that fits in the palm of our hand. While I wouldn’t recommend hosting a massive e-commerce site this way, for resumes, documentation, or personal landing pages, it’s a brilliant use of resources.
Have you tried running containers on your MikroTik yet? I’d love to hear about what you’re building or if you ran into any snags with the networking. Let me know in the comments below!