Setting up a V2Ray server manually is straightforward enough, but it can be a bit of a nuisance. If you’ve ever dealt with a “Connection Refused” error just because of a small typo in a JSON file, you know it’s mostly just tedious work. Often, it’s easier to have a tool that handles the repetitive parts so we can just get the connection working.
I’ve been using 3x-ui in a Docker container for this. It isn’t anything revolutionary, but it gives you a basic web panel to manage the protocols instead of editing files by hand. It’s a quick way to go from a blank server to a working connection in a few minutes.
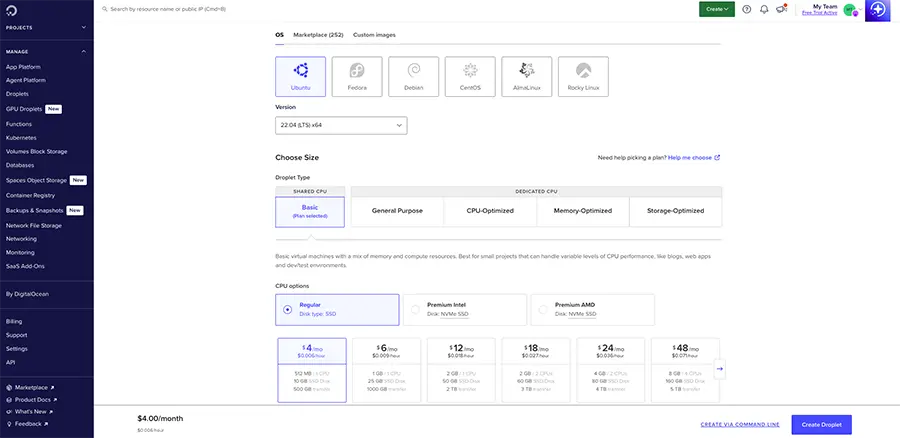
Step 1: Choosing and Renting Your Server
To run your own V2Ray server, the first thing you need is a Virtual Private Server (VPS).
While you can technically use any provider—like Hetzner, Linode, or Vultr—I usually recommend DigitalOcean. If you’re just starting out, their interface is much cleaner and less intimidating than most other platforms.
Choosing the Best VPS for V2Ray
When looking for a VPS for V2Ray, you don’t need a powerhouse. A simple machine with 1 vCPU and 1GB of RAM is usually the sweet spot for running V2Ray in Docker smoothly.
If you’re just using the server for yourself or a few friends, standard providers like DigitalOcean, Vultr, or Hetzner are perfect—their basic traffic limits are usually more than enough for personal use.
However, if you’re planning on heavy streaming or sharing the connection with more users, you might prefer a V2Ray VPS from providers like BlueVPS, AlexHost, or BuyVM, which offer unlimited traffic. Whether you go for a big name or an unmetered option, the goal of your VPS V2Ray setup is a stable, low-latency connection.
Why DigitalOcean?
DigitalOcean Droplets are consistently reliable and very affordable for a personal setup.
- The Plan: You don’t need a high-end machine. A basic $4 or $6/month Droplet is more than enough to handle V2Ray for you and a few friends.
- The OS: Stick with Ubuntu 24.04 or 22.04 LTS. It’s the most stable environment for Docker-based setups and has the best community support if you ever need to look something up.
Get $200 Free DigitalOcean Credit
If you want to try this out without spending your own money upfront, you can use my referral link to create an account. DigitalOcean currently gives new users $200 in free credit for 60 days. That’s more than enough to run a few different test servers and see how everything works for two months at no cost.
Step 2: Preparing the Server & Installing Docker
Once your Droplet is ready, the first thing you’ll need to do is SSH into your server. If you’re on Windows, you can use a terminal or something like PuTTY; on Mac or Linux, just use your built-in terminal.
Instead of installing 3x-ui directly onto the operating system, it’s better to use Docker. It keeps the server environment clean and makes managing updates much easier. After you’ve logged in, you can get Docker and Docker Compose set up with these standard commands:
# Update your server packages
sudo apt update && sudo apt upgrade -y
# Install Docker and Docker Compose
sudo apt install docker.io docker-compose-v2 -y
Step 3: Deploying the 3x-ui Panel
To manage the server protocols, we’ll use the MHSanaei 3x-ui repository. It’s a popular open-source project that gives you a clean web interface for managing your connections.
Getting it running is straightforward once you’ve logged in and have Docker ready.
Clone the Repository:
git clone https://github.com/MHSanaei/3x-ui.git
cd 3x-ui
Start the Container:
docker compose up -dAfter you run that, the panel should be live within a few seconds. You can verify the container running with this commands:
docker compose ps
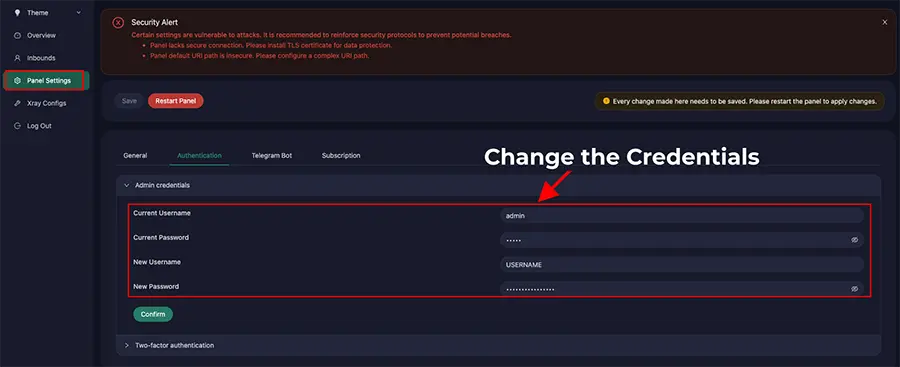
Step 4: Accessing the Panel and Securing Your Setup
Once the container is running, you can access the interface by going to http://YOUR_SERVER_IP:2053 in your browser.
One thing you shouldn’t skip is updating your login details. By default, the panel usually starts with admin / admin. If you leave it like that, anyone who knows the port can get in. Go straight to the Panel Settings and change the username, password, and—if you want to be extra safe—the port itself.
It only takes a minute, but it’s the most important thing you’ll do to keep your server secure.
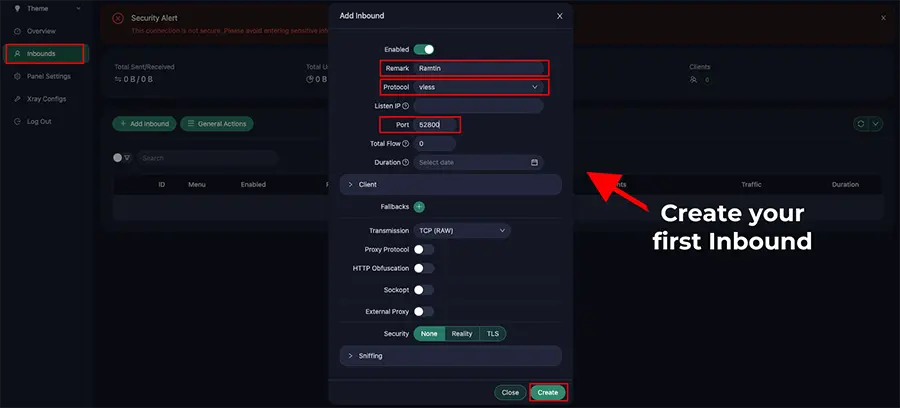
Step 5: Creating Your First Inbound
To actually get connected, you need to set up an “Inbound” in the 3x-ui dashboard. This defines how your device communicates with the server.
- Go to Inbounds: Click the Add Inbound button.
- Basics: Give it a Remark (like “MyPhone”) so you know which device it’s for.
- Protocol & Port: I usually go with VLESS—it’s lightweight and reliable for most modern setups. For the port, you can leave it as the default or pick a random number between 10000 and 65000.
- Save & Connect: Click Create.
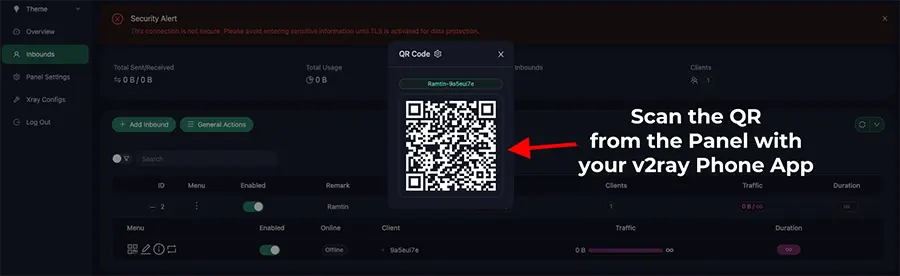
Once it’s added, you can click on its QR code icon. Scan that with your client app (like v2rayNG on Android or V2Box on iOS), and you’re good to go.
A Quick Note on the Firewall
Before you can actually connect, you need to make sure your server’s firewall isn’t blocking the traffic. By default, most Ubuntu servers have a firewall like UFW (Uncomplicated Firewall) that might be active. You’ll need to open the port for the 3x-ui panel itself and whatever port you chose for your V2Ray inbound.
It’s a good practice to keep everything else closed to stay secure. Here are the basic commands to handle that:
# Allow SSH so you don't lock yourself out!
sudo ufw allow ssh
# Open the 3x-ui panel port (default 2053)
sudo ufw allow 2053/tcp
# Open your V2Ray inbound port (e.g., 10000)
sudo ufw allow 10000/tcp
# Enable the firewall
sudo ufw enable
Step 6: Connecting Your Devices
Now that your server is running and your inbound is ready, the last step is to connect your devices. 3x-ui makes this easy by giving you two options: you can either scan a QR code directly with your phone or copy the configuration URL (the vless:// link) and paste it into your client app.
Here are the most reliable clients I recommend using in 2026:
- Android: v2rayNG is the go-to choice. It’s stable and supports almost every protocol you’ll need. If you need a detailed walkthrough on how to set it up, check out this v2rayNG for Android 2026 guide.
- Windows: v2rayN is the standard choice here. It can look a bit technical when you first open it, but once you import your config, it’s just a single click to get connected. If you want a step-by-step walkthrough, this v2rayN for Windows guide covers everything you need to know.
- iOS / Mac: V2Box is excellent for Apple users. It has a clean interface and works seamlessly across both iPhone and Mac.
- Linux / Multi-platform: Hiddify or v2rayA are great if you want a consistent experience across different operating systems.
To get connected, just open your app of choice, look for the “+” icon, and select either “Scan QR Code” or “Import from Clipboard”. Once the config is imported, tap the connect button, and you’re officially browsing through your own private server.
Final Thoughts
Running your own V2Ray server is just a practical way to take back control of your privacy. Using Docker and 3x-ui makes maintenance effortless, so you aren’t stuck troubleshooting config files all weekend.
Whether you’re here to learn or just want a faster connection, it’s a solid project to have under your belt. For everyone else, stay tuned to Net Admin HUB.
If you run into any snags with the firewall or your first inbound, drop a comment below.